This page describes the construction of an audio adapter for use with the iPAQ 5550 and a headphone/microphone combination designed to be plugged into a PC soundcard. For another very nice web page showing in pictures how to build such a cable see Vincenzo Ragone's article "Axim: in-out audio cable"
|
|
||
| connection | Headphone - plug (green) | Microphone - plug (red) |
|---|---|---|
| Tip | Left channel | Microphone |
| Ring1 | Right channel | Microphone (power) |
| Sleeve | Ground | Ground |
|
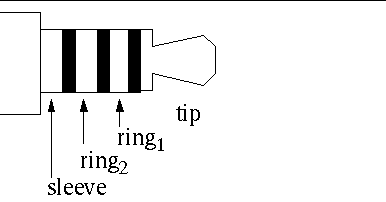
||
| connection | purpose | wire color |
|---|---|---|
| Tip | Left channel | white |
| Ring1 | Right channel | red |
| Ring2 | Microphone | black |
| Sleeve | Ground | shield |
The above color codes are based on the use of a premade 4 conductor 3.5mm plug with 1.8m cable (ELFA part number 42-708-31; this is Marushin part MC-4350). This part is made by Marushin Electric Manufacturing of Japan.
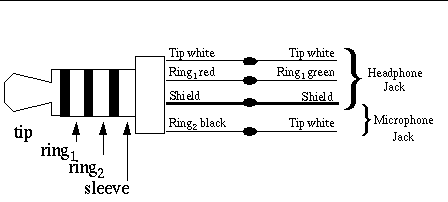
The adaptor was made by attaching two 3.5mm stereo (i.e., tip, ring, sleeve) line sockets (i.e. jacks) in the following manner. (The jacks are ELFA part number 42-700-96; the orignal vendors part number is 133-1-8 "BW1118 World Peak".). Ideally one of these should actually be red (for the microphone), such as ELFA part number 42-700-70 - which is the same jack, but red in color, instead of black. The two connectors were connected using CEAM cabling systems LiYCY cable. You only need 1 conductor + shield (such as ELFA 55-778-12), but I happened to use (ELFA 55-778-38) which has four 0.14mm^2 conductors + shield - with an outside diameter of 4mm.
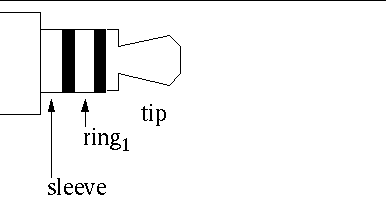
The jack for the headphones is connected as shown in the table
below. Note that Tip is the coppor colored connector on this
jack.
A connection was made to carry the microphone (black) to a
wire to the other jack (via the yellow wire). A second connection is
made by connecting the shields of both cables to provide a ground.
| connection | purpose | wire color |
|---|---|---|
| Tip | Left channel | white |
| Ring1 | Right channel | red |
| Sleeve | Ground | shield |
The jack for the microphone is connected as shown in the table below. Thus both tip and ring were connected to a wire (I chose yellow). Note: You can't use a mono jack, as the plug's ring would be connected to the sleeve contact of the jack - this the external microphone would not be used.
| connection | purpose | wire color |
|---|---|---|
| Tip | Microphone | yellow |
| Ring1 | Microphone (power) | yellow |
| Sleeve | Ground | shield |
A sample wiring diagram is shown below:
|
Details of how the iPAQ can detect if a microphone is connected or not and how the external microphone is powered can be found in the data sheet (pg. 26) of the data sheet for Asahi Kasei AK4535.
![[disclaimer]](http://www.kth.se/bilder/disclaimer.gif)
Detta är en personlig hemsida och åsikter framförda här eller i tillhandahållna länkar representerar inte KTH.
This is a personal homepage. Opinions expressed here or implied by links provided, do not represent the official views of KTH.
In addition to the usual disclaimer: This page is an independent (publication) and is not affiliated with, nor has it been authorized, sponsored, or otherwise approved by anyone. The trademarks and registered trademarks are the properties of their respective owners.
For information contact maguire@it.kth.se
![]()